Thursday, July 22, 2010

Coushion with" Flowers and buds" design-- continued


Continued from the Older post

Step 1

Draw the graph on the reverse of the fabric with squares of your choice. Smock the each block with “FLOWERS AND BUDS” design.
Step 2

Join the folds form at the back of the design by using METHOD 1 or METHOD To get good embossed effect, keep a sponge piece of same size of the gap, in the middle and stitch the folds together .Attach a lining for this smocked piece and then stitch the cushion.


Photobucket

Cushion with "Flowers and buds" design


Material needed .

In this design to calculate the width of the material that remains after smocking we have to just subtract the width of the squares marked “X”. I have drawn the design with squares whose sides are 3x3 .The length and width of portion A will be 7 x 3 =21 cm to find out the width of material that remains after smocking subtract the width of the square ,which is marked ‘X’. That is 3 x 4=12 cm. The width of the material after smocking is 21-12=9cm.The same calculation holds good for length also. You can arrange the blocks according to the measurements of your cushion. In this design width will be 10+9+8+9+10=46 cm. Length is the same.Seam allowance is included in this.

Tips
Secure the material well on to the working table with 3M tape and then draw the graph. Neatness depends upon the graph we draw. Always use matching thread for smocking. I use 3 strands of Anchor thread. Stitches taken should be uniform. After drawing the graph “Zig- Zag” the sides. I prefer to give lining to the smocked fabric and then stitch the cushion. This type of smocking is not elastic as English smocking. So it is better to stitch loosely fitted cushion covers.

Continued.............
Photobucket

Friday, July 16, 2010

Design "Flowers and buds"


In Canadian smocking “Bee cottage” design is very useful. Both right side and wrong side of the design are beautiful.
Using the wrong side of the design we can make varieties of designs. It is like our Indian “Rangoli" Once we master the technique we can create as many designs as we want. I will show you how to produce a beautiful flower pattern from the reverse of the pattern “Bee cottage”. I do not know it’s real name. I feel like naming it as” Flowers and buds”
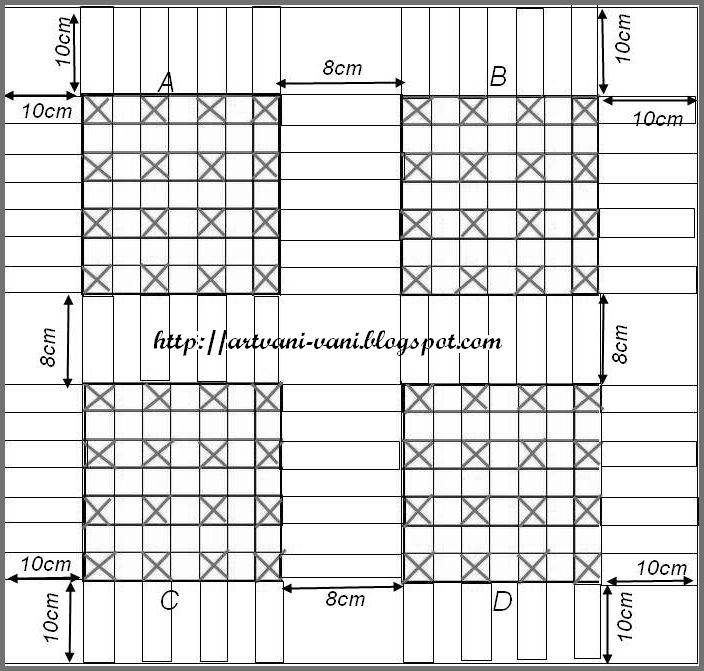
Draw squares of the dimensions of your choice on the wrong side of the fabric.Mark X . as shown in the graph.These are the squares in which smocking is done
After smocking the square marked X disappears .Width and the length of the smocked piece is equal width of the square x total number of gaps.


Photobucket

Wednesday, July 14, 2010

Method of doing "Flower design" in Canadian smocking


In Flower design folds are created by joining 4 points of a square. From this stitch we can create as many designs as we want. It has got many names. One of them is" Bee cottage."
Flower design is worked on the right side of the fabric. We cannot draw squares on the right side of the fabric as it shows. Only dots should be marked.Both the sides of this design are used to create designs.

Mark rows of dots 2 cm or 3 cm or 4 cm apart on right side of the fabric according to the design and according to your taste. I find it difficult to mark dots in the front. So as usual I secure the fabric to my working table with 3M tape and draw squares back side of the fabric. Then I transfer the corner points of the squares to the right side with the help of a light colored carbon paper.

Photobucket

Monday, July 12, 2010

Method of doing "Leaf design" in Canadian smocking


This is Leaf design in Canadian smocking.I have used 2cm square graph.I feel if I had used 1.5cm graph the design would have been more delicate.

Photobucket

Friday, July 9, 2010

Round cushion Using design "Rows of arrows"


I have used the design "Rows of arrows" in this cushion.


Photobucket

Sunday, July 4, 2010